
Do you want to insert WordPress page content into another page or post?
This allows you to create a piece of content once and then show it in multiple locations across your website. It can save you a ton of time and effort, especially when it comes to updating the content.
In this article, we will show you how to easily insert page content into another page or post in WordPress, step by step.

Embedding page content into other pages and posts in WordPress can save you time.
Instead of recreating the content multiple times, you can simply create the page or post once and then embed it in multiple locations across your WordPress blog. This is perfect for galleries, portfolios, and other websites where you often re-use the same content.
It’s also a good choice if you want to show the same reviews or testimonials on your About page, WooCommerce product pages, the homepage, and other locations.
This approach also makes it easier to update your content. Instead of editing multiple pages, you can simply update the ‘source’, and those changes will then appear across your entire WordPress website.
That said, let’s show you how to insert page content into another page or post in WordPress.
The simplest way to insert WordPress content into other posts and pages is by using Insert Pages. This plugin allows you to easily insert content using a block or a shortcode.
The first thing you need to do is install and activate the plugin. For more details, see our step-by-step guide on how to install a WordPress plugin.
Upon activation, open the post or page where you want to embed the page content and click on the ‘+’ icon.
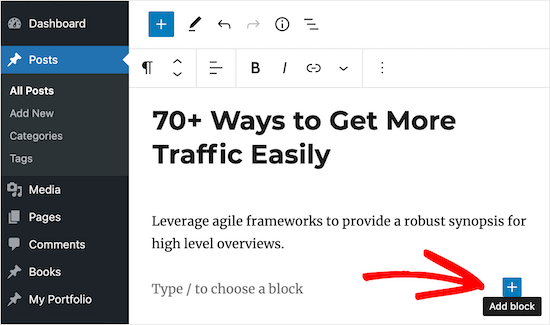
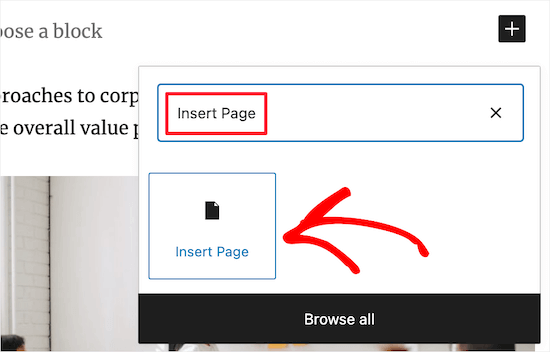
You can now type in ‘Insert Page.’
When the right block appears, click to add it to your website.
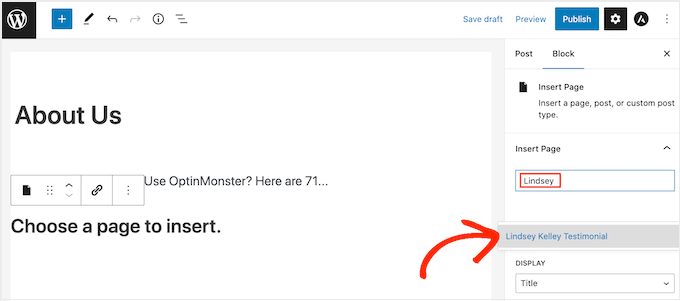
The next step is choosing the page that you want to embed using the settings in the right-hand menu.
Under ‘Insert Page,’ either enter the page’s URL or start typing its title, which opens a dropdown menu. You can then choose the right page or post from the dropdown menu.
After that, you can fine-tune how the embedded content will look in the ‘Settings’ section.
In the ‘Display’ dropdown, choose the content that you want to include, such as the post title, link, post excerpt, or even the entire page content.

You can also add custom CSS, choose to show the page content inline, and even hide pages from any anonymous users who haven’t registered on your WordPress website.
When you are happy with how the content looks, make sure to click the ‘Update’ or ‘Publish’ button to save your changes.
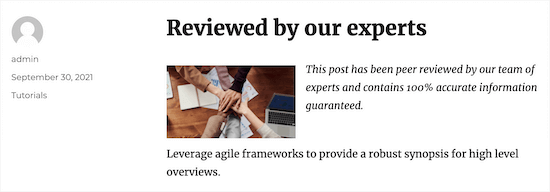
Now, if you visit your post or page, then you will see the page or post content embedded in your WordPress website.
Using Shortcodes to Add Page Content in WordPress
If you don’t want to use the Insert Page block, then you can use a shortcode instead.
The plugin has shortcode parameters that let you customize the page content that you want to display. For example:
[insert page='page-slug|ID' display='title|link|content|all|custom-template.php']
This shortcode method may be quicker if you want to add the same content and styling to multiple pages. Simply paste the shortcode anywhere on your site, and WordPress will show the right content with the right styling.
In the shortcode above, you’ll need to replace the 'page-slug|ID’ with the page or post’s slug or the post ID.
For more information, please see our guide on how to find IDs in WordPress.
You also need to change ‘ title|link|content|all|custom-template.php’ to the type of page content you want to display and the styling it should have.
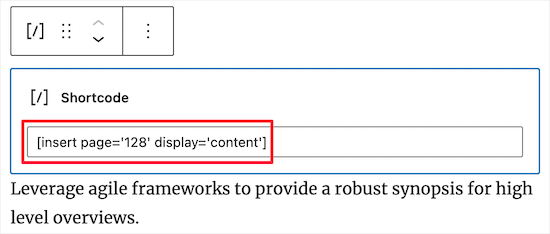
For example, the shortcode below will show a page with the ID of ‘128.’ It will also show the page’s content:
[insert page='128' display='content']
To place the shortcode, just open a post or page and then click ‘+’ to add a new block.
In the popup, search for ‘Shortcode’ and then select the right block when it appears.
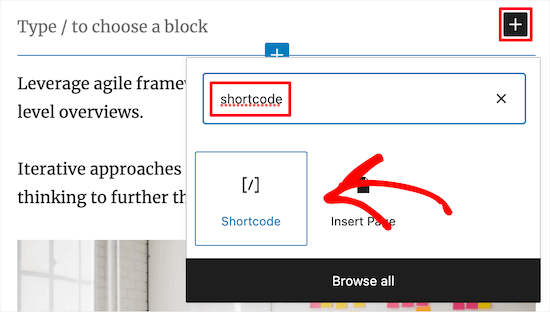
Now, simply paste the shortcode into the new block.
Make sure to click the ‘Update’ or ‘Publish’ button to save your changes.
With that done, you can visit your WordPress website to see the embedded page or post content live.
If you are using one of the newer full site editing themes, then you can insert WordPress page content into any template or template part. This is an easy way to show the same content across multiple pages. For example, you might add a customer review to all your blog pages.
It’s also a way to add content to areas you can’t edit using the standard WordPress content editor. For instance, you can insert page content into your 404 page template.
To get started, head over to Appearance » Editor in the WordPress dashboard.

By default, the full site editor shows your theme’s home template, but you can insert page content into any area.
To see all the available options, just select either ‘Templates’ or ‘Template Parts’.
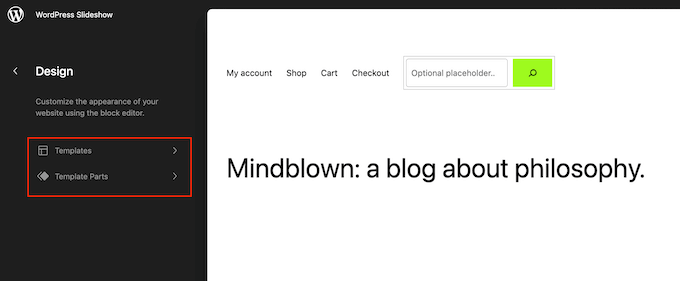
You can now click on the template or template part you want to edit.
WordPress will now show a preview of the design. To go ahead and insert page content, click on the small pencil icon.
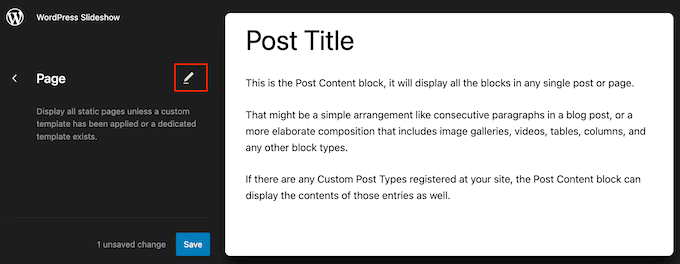
You can now add the Insert Page block by following the same process described above.
Another option is to embed the page content using the Shortcode block. To do this, simply follow the instructions above.
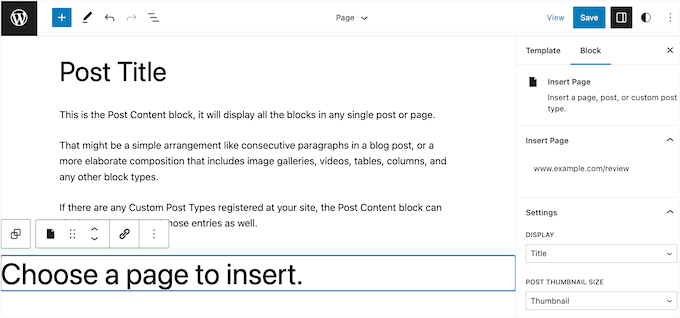
When you are happy with how the embedded content looks, click on the ‘Save’ button to make it live.
If you are using custom post types to organize your content, then you can add these to your posts and pages, too.
For example, you might create a custom post type for your image galleries, videos, testimonials, portfolio items, and more.
For more details, please see our guide on how to create custom post types in WordPress.
Once you’ve added a custom post type to WordPress, simply go to the page or post where you want to embed that content. You can then insert the content by following the same process described above.
Here’s a page with content embedded from multiple posts that all have the ‘Book’ custom post type.

As we’ve already seen, Insert Pages has some settings that allow you to customize how the inserted content looks. However, if you want full control over the embedded content, then you can create a custom page template.
This method requires you to edit theme files and add custom code, so it isn’t recommended for beginners. If you haven’t edited your website’s code before, then please see our beginner’s guide to pasting snippets from the web into WordPress.
We also recommend creating a WordPress backup so you can restore your website if anything goes wrong. For more details, see our guide on how to back up your WordPress site.
With that done, you are ready to create a custom page template.
First, open a plain text editor like Notepad and give the file a name. You can use anything you want, but it’s a good idea to use something descriptive, like custom-page-template.php .
Then, paste the following code into the empty file:
Hosted with ❤️ by WPCodeThe code snippet above is a very basic template, so you may want to customize it to better fit your feeds.
When you are happy with how the template looks, the next step is uploading it to your WordPress theme folder.
To start, you’ll need to connect to your website via FTP or your WordPress hosting file manager and then upload the file to the right folder.
After that, open the page or post where you want to use the custom template. In the right-hand menu, open the ‘Display’ dropdown and choose ‘Use a custom template.’
You can now type a backward slash into the ‘Custom Template Filename’ field, followed by the template’s name.

Once you are finished, make sure to click ‘Update’ or ‘Publish’ to make your changes live.
Apart from adding content from one page to another, you can also insert ads within your page content. If you have a WordPress blog, then this can help you earn money online.
To insert ads within page content, you must install and activate the WPCode plugin because it is a great ad management tool.
Upon activation, visit the Code Snippets » + Add Snippet page and click the ‘Use Snippet’ button under the ‘Add Your Custom Code (New Snippet)’ option.

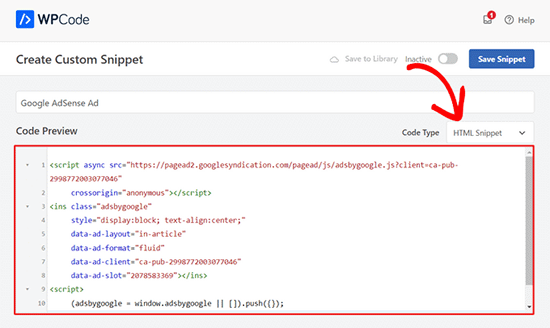
This will take you to the ‘Create Custom Snippet’ page where you have to select ‘HTML Snippet’ as the code type from the dropdown menu.
Next, simply paste your ad code into the ‘Code Preview’ box.
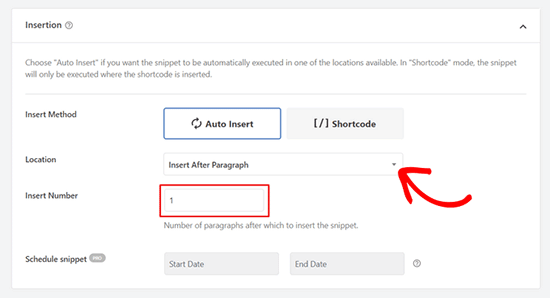
Once you have done this, scroll down to the ‘Location’ section and select the ‘Insert After Paragraphh’ option.
Then, type the number of paragraphs after which the ad will be inserted into your page content.
Finally, scroll back to the top and toggle the ‘Inactive’ switch to ‘Active’. Then, click the ‘Save Snippet’ button to store your settings.
You have now successfully inserted an ad within your page content. For more information, you may like to see our tutorial on how to insert ads within your page content in WordPress.
We hope this article helped you learn how to insert WordPress page content into another post or page. You may also want to see our guide on how to make money online blogging with WordPress and our expert picks for the best landing page plugins.
If you liked this article, then please subscribe to our YouTube Channel for WordPress video tutorials. You can also find us on Twitter and Facebook.